Install Webmin Ubuntu Via Ssh Command
Webmin. Installing on Debian. Devil May Cry 4 Pc Installer. If you are using the DEB version of webmin, first download the file.
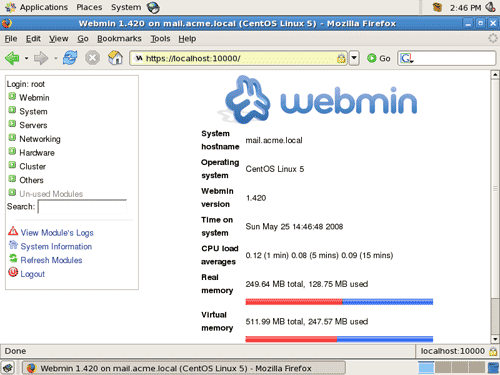
You should now. be able to login to Webmin at the URL http: //localhost: 1. Or if accessing it remotely, replace localhost with your system's IP address. If Debian complains about missing dependencies, you can install them.
If you are installing on Ubuntu and the apt- get command reports that some of the packages cannot be found, edit /etc/apt/sources. Some Debian- based distributions (Ubuntu in particular) don't allow logins. However, the user created at system. Webmin will allow. If you want to connect from a remote server and your system has a firewall. Using the Webmin APT repository. If you like to install and update Webmin via APT, edit the /etc/apt/sources.
You should also fetch and install my GPG key with which the repository is. You will now be able to install with the commands . All dependencies should be resolved automatically. Supported Debian- based Distributions. Webmin has been tested on all regular Debian releases, Ubuntu Linux, and. Xandros and APLINUX. Source Packages. The files needed to build the Debian package are.
Install Putty to administer Ubuntu Server remotely. Having installed Ubuntu Server we now need a way to be able to administer the server remotely. NOTE: If you're jumping into this guide here and have not been following from the start then in order to be able to use Putty to administer Ubuntu Server you will need to have installed . Putty is a very popular way of doing so although everything is done at . However, later on we'll install VNC to provide a graphical interface which will make things a whole lot simpler, especially for the Windows veterans amongst us. So, back onto your Windows desktop computer now and download Putty.
When you launch it the main screen looks something like this: To connect to your new server using Putty you'll need the Host Name or IP Address of the server. The Host Name is the name you gave the server when you installed Ubuntu. In the screenshot above you can see I've called mine My. Media. Server. You can of course just use the IP Address of the server. The IP address can be found via the admin menus on your router. Alternatively, it can be found by issuing the .

It'll typically be something like 1. Make sure the SSH option on the above screen is checked, give the Session a name in the Saved Sessions box (in the screenshot above you can see I've called the Session My.
Media. Server) and then click Save to save the session. I tend to use the same name for the Saved Session as I do for the device I'm connecting to, especially as I'm connecting to several different machines using Putty. By default Putty uses a blue colour for some of the screen output which I personally find tricky to read. Maybe it's my monitor or maybe just my eyes but either way I like to change it to something more readable. So, on the left hand side of the Putty Screen above you can see Colours within the Window option.
Click on Colours and in the Select a colour to adjust: list scroll down to ANSI Blue. You will probably see the RGB value: options as being 0 0 1. I change mine to 0 2. You can of course pick any colour combination you like.
Installing Putty will enable you to administer Ubuntu Server remotely. Guide applicable to Trusty Tahr 14.04LTS, Quantal Quetzal 12.10, Precise Pangolin 12.04LTS. DOCKER VERSION HERE UPGRADE INSTRUCTIONS FROM 0.9.x HERE The following will install Guacamole 0.9.13, Tomcat 8, and MySQL for you. All you have to doContinue.
How to administer Ubuntu Server remotely using Webmin. NOTE: If you're jumping into this guide here and have not been following from the start then it's worth.
I just installed Ubuntu. How do I set it up to allow me to ssh into it? Right now I get "ssh: connect to host x.x.x.x port 22: Operation timed out". How To Install VNC Server On Ubuntu 14.04 This guide explains the installation and configuration of a VNC server on Ubuntu 14.04 server.
Once you made any changes don't forget to save them. You do this by clicking on the Session option at the top of the screen and then clicking Save. Now click the Open button to connect to your server. When you connect to your server for the first time you'll get a message similar to this: Just click Yes. Now you should see the following screen: Enter the login name and password you created during the installation of Ubuntu and you'll now be at the command prompt, the same as if you had a monitor and keyboard attached to your server and were typing directly into it. Still stuck? Not what you were looking for? Then head over to the Discussion Forum.